An ongoing issue in the use of forensic evidence in the criminal justice system is the challenge of fulfilling the need for more quantitative methods in some of the impression and pattern evidence disciplines, including tool mark evidence.[1] The Ames Laboratory researchers in this project address that issue directly by developing a prototype tool mark analysis system that, “is an excellent first-step in showing that objective, nonpartisan systems are not only possible, but practical.”
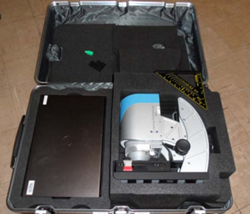
The goal of the project, supported by NIJ, was to develop a working prototype for tool mark analysis that could serve as a model for future research. The system, developed by the researchers to be used at crime scenes, weighs about 80 pounds and fits in a suitcase. It “has been designed to provide forensic examiners with the ability to characterize a tool-marked surface, compare the data from that surface to data files obtained from other surfaces, and evaluate the likelihood that the two surfaces match using a statistical algorithm.” The researchers noted that the prototype allows noncontact acquisition of data from both flat and curved surfaces, and also provides excellent data from steep-sided samples such as the end of a screwdriver.
The prototype, based on equipment obtained from Alicona, a company that specializes in 3-D surface measurement instruments, consists of an optical profilometer (to measure surface roughness), a traveling case, and a laptop computer running modified software that has been simplified to ease training.[2] Once the prototype had been assembled, the researchers began their study by measuring a set of 50 sequentially manufactured screwdriver tips. As the software “matured,” additional samples were analyzed, including 50 sequentially manufactured shear-cut pliers and 50 cold chisels. More complex analyses of bullets and knife cuts were also done, but with less success due to the very large size of the data files created.
After completing their tool mark studies, the researchers concluded that the prototype “can obtain excellent data from extremely variable surfaces in a fraction of the time of previous optical systems.” The statistical algorithm used to gather data of striated and quasi-striated tool-marked surfaces allowed for the “objective comparisons of tool marks,” with the best results coming from marks made by screwdrivers, chisels, and cut pliers.
The “application of the algorithm to complex markings such as bullet marks and knife cuts has resulted in the identification of new problems and challenges that must be addressed,” the researchers said. “It is apparent that additional algorithms will need to be developed to handle specific tool mark types.”
The researchers called for further development of statistical algorithms, enhancements to the software, and an upgrade of the entire system to better capture images of cylindrical objects, such as bullets. In addition, they said, “expansion into the field of firearms will greatly strengthen the utility and appeal of the prototype system.”
About This Article
The research described in this article was funded by Interagency Agreement IAA-2011-DN-R-0230 MOD 2, awarded to Ames Laboratory. This article is based on the grantee report “Development of a Mobile, Automated Tool Mark Characterization/Comparison System” (pdf, 47 pages), by L.S. Chumbley, S. Zhang, and M. Morris, Ames Laboratory


